
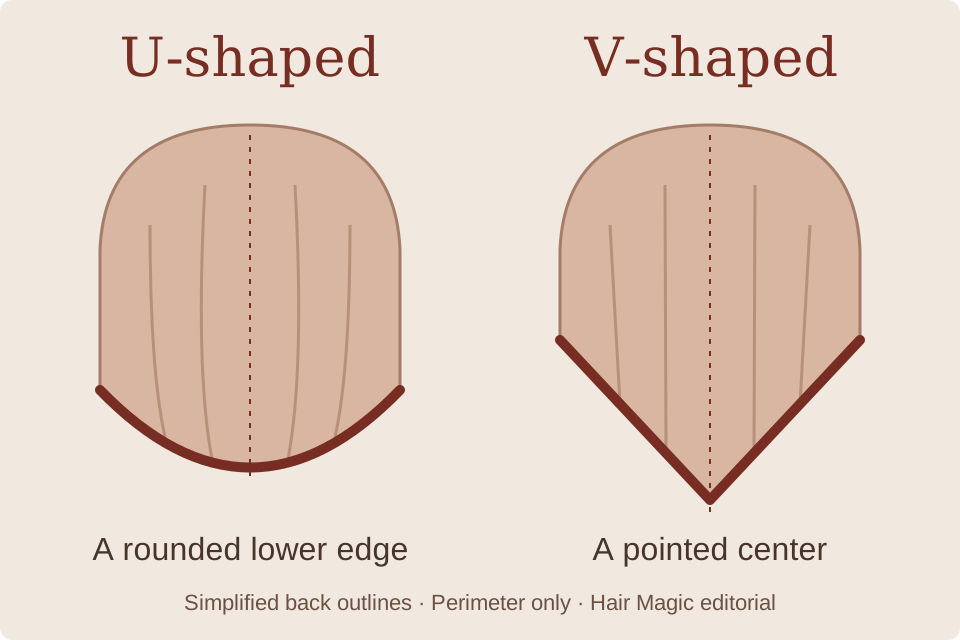
A U-shaped haircut has a rounded lower outline when viewed from the back. A V-shaped haircut narrows toward a more pointed center. The U-shaped vs. V-shaped haircut decision is about that perimeter, not automatically about how many layers you have. You can discuss the back outline, internal layers and face framing as separate parts of the same haircut.
This distinction matters because a front-view inspiration photo may tell you very little about the shape behind your shoulders. Before requesting either cut, look at a clear back reference and decide how much difference you want between the center length and the hair at the sides.
If your other option is a level baseline, compare a U-cut with a straight-across cut. Its back-view illustration makes the side-length difference easier to discuss.
What you are seeing in the back view
Hair.com's U-shaped versus V-shaped cut guide describes the U as a softer rounded outline and the V as a more pronounced angled shape. Those descriptions identify the visual difference; they do not establish one fixed angle or minimum length for every head of hair.
For your own references, trace the lowest visible edge with your eyes. Does it curve gradually toward the center, or form two sides that meet at a clearer point? Then notice how far the outer sections sit above the longest center section.
If you like the label but dislike that difference in a photo, explain the difference rather than assuming every version will look the same. You might want a shallow rounded outline, a more visible curve or a restrained point. A stylist can help translate that preference into an appropriate plan.
Longest length and overall fullness are different questions
Keeping a long center section does not mean every part of the haircut will remain equally long. That is particularly important if your main instruction is simply “do not take much off the length.” You and the stylist may be thinking about different sections.
Point to the lowest length you want to preserve, then discuss the outer lengths separately. Ask the stylist to show where the proposed edge would sit at the sides. This is easier to understand with a mirror or a clearly marked reference than with a general promise to keep your hair long.
Also explain how you want the ends to look. You might enjoy a tapered outline, or prefer a broader-looking lower edge. Treat that as an appearance preference rather than a claim that one shape will change your actual hair density.
A U or V outline does not answer the layers question
The perimeter is the outside boundary of the haircut. Layers describe differences in length within it. A reference can combine a curved or pointed outline with restrained layers, stronger layers or a separate face-framing design.
When discussing a photo, ask what would change at the bottom and what would change through the interior. If you only want a different back outline, make that clear. If you also want movement around the face, identify it as an additional request.
Our blunt cut versus layered hair comparison explains how the visible edge and internal movement relate. For a more pronounced change around the upper sections while keeping length underneath, compare butterfly cuts with long layers separately.
Think about where the hair sits when you bring it forward
A back outline can look different once you move the hair in front of your shoulders. The outer sections may become much more noticeable, while the longest center lengths are less obvious. If you usually wear your hair forward, that view deserves as much attention as the back.
During the consultation, show how you naturally arrange your hair rather than keeping it in the position used for a reference photograph. Explain whether you want similar-looking length on both sides at the front or enjoy a more tapered appearance.
The aim is not to make the haircut look identical from every angle. It is to choose a shape that you like in the positions you actually use. A dramatic back image can be appealing while telling you surprisingly little about the view you see in the mirror every morning.
Ponytails, braids and clips make the side lengths important
If you regularly tie your hair up, show the stylist the height and position of your usual ponytail or bun. Ask how the proposed side lengths would behave in that arrangement. Your needs may be different from someone who mostly wears their hair down.
For braids, consider whether you enjoy a tapered end or prefer more of the length to remain together near the bottom. You do not need to predict the exact result yourself. Bring the question to the person who can assess your current lengths and the proposed cut.
Write your practical requirement in positive terms: “I want these sections to reach this clip” is clearer than “I do not want too many short pieces.” If a particular accessory matters to your daily comfort, bring it to the appointment so the requirement is easy to demonstrate.
Straight, wavy and curly hair show outlines differently
On straighter hair, a clear back view can make the perimeter relatively easy to trace. Still, shoulder position, camera angle and the way hair has been arranged can alter what you see. Choose a reference where the person is standing naturally and the lengths are not being pulled into place.
With waves and curls, the lowest visible points may shift as sections settle into their usual pattern. A geometric outline in a smoothed reference should not be treated as a promise of the same visible line in a textured finish.
Tell your stylist which finish you wear most often and ask to discuss the outline in that state. Our curly hairstyle preview guide explains why generated curl shapes need interpretation. An AI image cannot determine the exact dry position of your real ends.
Make a three-view reference brief
Collect three images with different jobs. Use a back image for the perimeter, a front image for the pieces near your face, and a current photo to show your starting point. A side reference can be useful if the difference between the front and back lengths is central to your decision.
Under the back image, write what you want to keep and what you would soften. For example: “I like the rounded bottom, but I want less difference between the center and sides.” Under the front image, describe the shortest pieces you would feel comfortable wearing.
Keep the instructions separate. Otherwise, a stylist may reasonably interpret a strongly layered front reference as approval to change the interior even though you only meant to discuss the back edge. A small amount of annotation can prevent a large misunderstanding.
Use Hair Magic for the front-facing decisions
Hair Magic can help you explore the overall long-hair direction and the framing near your face. Its verified features do not establish a dedicated U-shaped or V-shaped back-view simulator. A generated front-facing image cannot confirm the exact perimeter at the back of your head.
To explore the related visible choices, take or select a clear photo in the iPhone app and browse longer styles. Keep the color near your current shade. Where the selected style supports length, layers or parting adjustments, use those to investigate one preference at a time.
Review your choices and tap Generate. The photo is uploaded for cloud AI processing, which requires internet access. Compare the result with your original and note what you enjoy about the front and overall length. Follow the photo hairstyle try-on guide if you are using the app for the first time.
Keep your separate back reference alongside the preview when preparing the consultation. This gives each image a clear job: the preview helps discuss your visible framing, while the reference communicates the perimeter you want the stylist to assess.
Avoid these three reference-photo mistakes
First, do not compare one image with all the hair behind the shoulders against another with half the hair brought forward. You are no longer seeing the same amount of hair at the back, so the outline can be misleading.
Second, avoid assuming that a glossy or curled finish is part of the perimeter itself. Ask which features would remain visible in your usual finish. A shape you like only when it is arranged for a photograph may not meet your everyday expectations.
Third, do not treat the longest visible point as the only meaningful length. The amount of hair reaching nearby points matters to how the whole outline reads. Ask your stylist to discuss the center, sides and front as distinct areas before cutting.
Questions for the consultation
- How would this back outline translate to my current length and texture?
- Where would the side sections finish compared with the center?
- Could we change the perimeter while keeping the interior relatively similar?
- What would I notice when bringing the hair forward or tying it up?
- How would the outline look in my normal dry finish?
- What would be involved if I later wanted a more even lower edge?
Use a Salon Card to organize the selected style and practical notes, and keep the back reference available separately. Hair Magic is free to download with in-app purchases; AI preview access depends on your in-app entitlement.
Which should you choose?
Choose the visual direction you can describe clearly: a softer curve, a more pronounced point, or only a small change from the outline you already have. Then ask your stylist what version fits your starting hair and practical needs.
If your strongest priority is retaining useful side length, place that above the haircut name in your brief. If the back silhouette is the main attraction, give it its own reference. A clear agreement about the parts you will notice is more valuable than choosing a letter and hoping it communicates everything.
About this guidance. Published by Hair Magic, the app discussed here. Product details are based on the Hair Magic App Store listing, checked on 18 October 2026. This is planning guidance, not a professional assessment of your hair. AI previews are visual estimates; features and prices may change.
Read our editorial approach or explore all journal articles.