
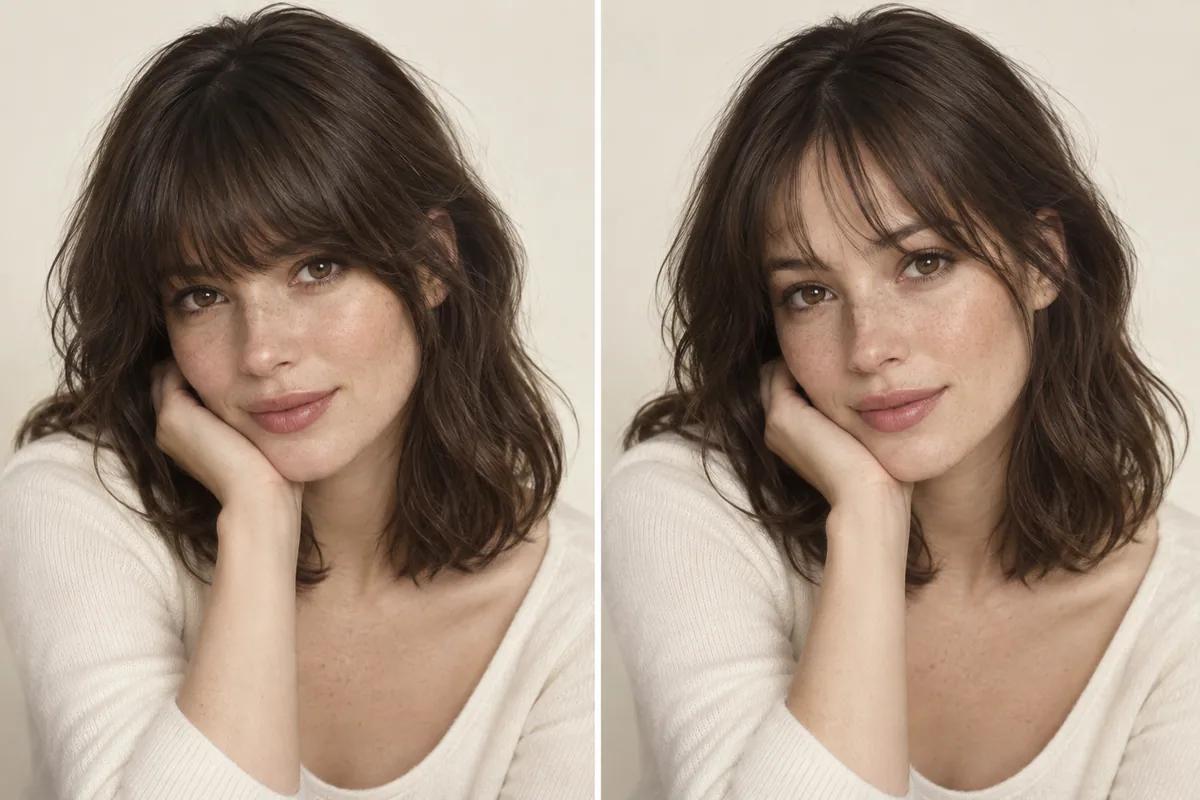
French bangs and wispy bangs are not mutually exclusive. French bangs is a broad style label, often used for a softly textured fringe with longer edges. Wispy describes a light, separated appearance. A fringe can be both. If you are choosing between two pictures, compare their forehead coverage, shortest length and side pieces rather than assuming the labels describe opposite cuts.
That may explain why the pictures you have saved seem hard to sort. The same brow-level fringe can appear under both names. A better decision comes from identifying what you like about the picture, then asking for those details in language your stylist can check with you.
Why “French” does not mean one exact fringe
In Makeup.com's original interview about French bangs, hairstylist and Matrix ambassador Castillo Bataille describes a textured, wispy front with a shorter center and longer sides. His description already includes both ideas in the comparison.
French-inspired references may show a loose center gap, a softly uneven line, or hair resting near the brows. Some look fuller; others expose more forehead. The label communicates an overall impression, but it does not supply a standard length or density your stylist can reproduce without further discussion.
Wispy is more directly about how separated the fringe looks. It still leaves plenty unanswered: how long it is, where it opens, how much hair sits at the sides and whether the finish has been shaped with a brush.
If your two favorite photographs look nearly identical once you hide the captions, you probably do not have a choice between two categories. You have a shape you like, and the next job is describing it accurately.
Read a fringe from the center outward
Start directly above the bridge of the nose. Is there a clear gap? A few short pieces? A fuller section with small spaces between strands? Move toward the eyebrows and look at whether the coverage becomes heavier, lighter or stays much the same.
Next, find the shortest ends. A fringe just above the brows can feel different from a light fringe brushing the lashes, even when both are called wispy. Do not let the airy texture distract you from where the hair will sit.
Finally, trace the outer edge toward the temples. Do the pieces get gradually longer, end close to the center length, or become distinct side sections? That connection contributes a great deal to the overall shape. It is also the detail that can disappear when a reference is tightly cropped around the eyes.
Use this small comparison to annotate your saved pictures:
On a small screen, swipe the table to compare every column.
| What you see | What it tells your stylist | What it does not establish |
|---|---|---|
| Visible gaps between pieces | You like a separated, lighter appearance | How much hair should be cut into the section |
| Hair resting near the brows | You like that apparent dry length | Where to cut your hair wet or stretched |
| Longer pieces at the edges | You want a transition toward the sides | Whether those pieces will tuck behind your ears |
| A little center opening | You like space in the middle | Whether the rest of the hairstyle must have a center part |
The editorial illustration above is useful for comparing visible shapes. It is not evidence of a particular cutting method or a finished Hair Magic result.
Coverage and length are separate choices
Imagine two fringes ending in the same place near the eyebrows. One has a fuller band of hair; the other shows plenty of skin between pieces. Their length matches, but their presence around the face is different.
Now imagine two equally light fringes. One ends above the brows, while the other reaches lower and separates around the eyes. Their density looks similar, but they may feel quite different to wear. You can prefer light coverage without wanting long pieces near the lashes.
Write both choices down. For example: “A little forehead visible between the pieces, with the shortest ends clear of my eyes.” Or: “More coverage through the center, with longer sides, but no sharply straight lower edge.” These are clearer requests than “French, but not too French” or “wispy, but not thin.”
Avoid asking for a cutting technique because you think it guarantees the appearance. Describe the result and let the stylist assess the available hair. Removing more weight is not automatically the answer to every reference that looks airy; the starting density and intended shape need to be considered together.
Look at the eyebrows and glasses together
Your eyebrows and frames remain part of the picture after the haircut. If you wear glasses daily, evaluate the fringe with them on. A reference without glasses cannot show where the front will meet your own upper rim.
Notice whether you like a visible strip between the fringe and the frames, some overlap, or a more open center. Then look at the side pieces around the temples. Do you usually tuck them away when putting glasses on? Are you happy to arrange them again afterward?
These are practical preferences, not restrictions on who can wear bangs. Our hairstyles with glasses guide offers a fuller checklist for judging the combination. Bring your everyday frames to the consultation rather than assuming any pair will give the same reference point.
Ask for an ordinary-day reference
The words relaxed and undone describe an appearance. They do not prove that no one styled the hair. A fringe may have been carefully separated, curved or lifted before the photograph was taken.
Look for a reference closer to the finish you expect on a regular day. If all your saved images show perfectly placed pieces, ask the stylist what the proposed cut would look like after your usual drying routine. The answer may be less even or more open than the photograph, and you might still like it.
Try comparing the same reference at full size and as a small thumbnail. At full size, individual separated strands may draw your attention. At thumbnail size, you see the overall band of coverage. If the second view feels heavier than you wanted, say so. This is a visual preference exercise, not a test of what will suit your face.
Before the appointment, notice how your current front behaves after a hat, a walk or several hours at your desk. You are looking for habits to mention: perhaps it always opens on one side, or you repeatedly push the middle back. That information helps make a realistic plan for a shorter front.
Match the reference to the texture you wear
A smooth, separated fringe and a curly fringe can both have a light appearance, but they achieve their visible spacing differently. Do not expect a curl to imitate the path of a straight strand in an illustration.
If your hair is wavy or curly, show it dry in your normal finish. Say whether you want a softly grouped fringe or more open space between the front curls. Let the stylist assess how the shortest pieces should connect with the rest.
If you frequently alternate finishes, explain that too. Agree on which version matters most for length and comfort. You might enjoy a fringe near the brows when smooth but want more space around the eyes in its natural texture; that is worth discussing before the cut.
For a distinctly parted front, the curtain bangs versus wispy bangs article separates the opening from the amount of coverage. You can combine those preferences without needing one perfect trend name.
Use a preview to choose the amount of visual change
Hair Magic lets you explore supported bangs styles on a photo of yourself. Open the app on your iPhone, select or take a clear photo and browse for a fringe direction close to your reference. Available bangs, parting and length details depend on the selected hairstyle.
Use the available choices to compare how much of your forehead is covered and how the sides frame your eyes. Treat the result as a starting point for discussing fringe density with your stylist. Keep color steady, and avoid changing several other features while you are trying to decide how the front feels.
Tap Generate when ready. The app uploads your photo for cloud AI processing, which needs an internet connection. Review the result against your original, paying attention to the forehead, brows and side connection. The bangs preview guide explains the process and limitations. The app is free to download with in-app purchases; check the generation access shown before proceeding.
Save a preview if it helps express a preference. It cannot confirm the amount of fringe your own density supports, predict a cowlick or replace a stylist's assessment of the starting hair. An image that is only partly right can still be useful if you annotate the exact part you want to keep.
Describe the fringe without its nickname
Try this version of a salon request: “I like this soft, separated front. I want some forehead showing, the shortest pieces around this level when dry, and longer edges connecting to the sides. I wear it with these glasses, and this is the amount of styling I usually do.”
Show each point on the reference instead of asking the stylist to infer it. Add one thing you want to avoid, such as a dense straight edge or long central pieces brushing the lashes. Keep those notes with your chosen image or Salon Card.
Before the scissors come out, make sure you and the stylist agree on the length, coverage and side shape, whatever you call the result.
About this guidance. Published by Hair Magic, the app discussed here. Product details are based on the Hair Magic App Store listing, checked on 1 October 2026. This is planning guidance, not a professional assessment of your hair. AI previews are visual estimates; features and prices may change.
Read our editorial approach or explore all journal articles.